Collectie 108+ Ender 3 V2 Bltouch Cura Gcode
Collectie 108+ Ender 3 V2 Bltouch Cura Gcode. All gists back to github sign in sign up sign in sign up {{ message }} instantly share code, notes, and snippets. Sign up for free to join this conversation on github. Move to x0 y0 m109 s{material_print_temperature} t0 ;

Uitgelicht Coreception 3d Printer Trouble Shooting Sainsmart Resource Center
Start/end gcodes for bltouch ender 3. Move to side a little g1. Hardware this tutorial will be based on:Perfect start gcode for ender 3 (pro, v2) and auto bed leveling.
Bltouch do full bed level g1 x0 y0 f2000 ; I have check my bltouch install, it's ok. Perfect start gcode for ender 3 (pro, v2) and auto bed leveling. Hey everyone, this is my custom start gcode (for cura) that i found to be perfect with my ender 3 v2 with a bltouch (works with the other ender 3s too, apart from the max, and with other probes). If you are using a different extension wire, please pay attention to the wire colors above. The problem was i used it in creality slicer the original slicer wich come out with my ender 3 pro.

Hardware this tutorial will be based on: Heat bed and wait g28 ; End of custom end gcode: It preheats only the bed to 60° before leveling, so it doesn't waste time to preheat. My z offset is set. I have add g29 after g28. Move to side a little g1.

Hey everyone, this is my custom start gcode (for cura) that i found to be perfect with my ender 3 v2 with a bltouch (works with the other ender 3s too, apart from the max, and with other probes). Heat bed and wait g28 ; The bltouch kit we used comes with everything you need to install and set up the bltouch on your ender 3, ender 3 v2, or ender 3 pro. Wait for nozzle to reach temp g92 e0 ; The problem was i used it in creality slicer the original slicer wich come out with my ender 3 pro.. You're welcome to save a little money and buy everything separately, as well as 3d print the bltouch mount—but, honestly, for the extra cost.

It has a different bracket for each of the printers, so make sure to select the right printer on creality's website. Perfect start gcode for ender 3 (pro, v2) and auto bed leveling. End of custom end gcode: Hey everyone, this is my custom start gcode (for cura) that i found to be perfect with my ender 3 v2 with a bltouch (works with the other ender 3s too, apart from the max, and with other probes). In this guide, we'll show you how to easily update the ender 3 preset in cura to work for your ender 3 v2. Move z axis up little to prevent scratching of heat bed g1 x0.1 y20 z0.3 f5000. Move to side a little g1. When i run print, printer do 9 dots matrix to check bed. In this guide, we'll show you how to easily update the ender 3 preset in cura to work for your ender 3 v2.

Bltouch do full bed level g1 x0 y0 f2000 ; Start/end gcodes for bltouch ender 3. Move to x0 y0 m109 s{material_print_temperature} t0 ; Bltouch home xyz axis ;g29 ; You're welcome to save a little money and buy everything separately, as well as 3d print the bltouch mount—but, honestly, for the extra cost. Wait for nozzle to reach temp g92 e0 ; Bltouch do full bed level g1 x0 y0 f2000 ; Z don't move (i deliberately misaligned the bed and try print a calibrating, see picture). Perfect start gcode for ender 3 (pro, v2) and auto bed leveling. In this guide, we'll show you how to easily update the ender 3 preset in cura to work for your ender 3 v2. I have add g29 after g28.. Load ubl g29 j2 ;

My z offset is set. I have check my bltouch install, it's ok. My z offset is set. Reset extruder g1 z2.0 f3000 ; Draw the first line g1 x0.4 y200.0 z0.3 f5000.0 ; Start/end gcodes for bltouch ender 3. End of custom end gcode: Most of the steps are applicable to v4.2.7 board, except the firmware version. The bltouch kit we used comes with everything you need to install and set up the bltouch on your ender 3, ender 3 v2, or ender 3 pro. Bltouch do full bed level g1 x0 y0 f2000 ;. Move to start position m109 s{material_print_temperature_layer_0} ;

Start/end gcodes for bltouch ender 3... Bltouch do full bed level g1 x0 y0 f2000 ; The problem was i used it in creality slicer the original slicer wich come out with my ender 3 pro. Move to start position m109 s{material_print_temperature_layer_0} ; Hardware this tutorial will be based on: You're welcome to save a little money and buy everything separately, as well as 3d print the bltouch mount—but, honestly, for the extra cost. End of custom end gcode:. I have add g29 after g28.

Reset extruder g1 z2.0 f3000 ; My z offset is set. Bltouch home xyz axis ;g29 ; Most of the steps are applicable to v4.2.7 board, except the firmware version. I have check my bltouch install, it's ok. Heat bed and wait g28 ; The problem was i used it in creality slicer the original slicer wich come out with my ender 3 pro. I have add g29 after g28. Move to x0 y0 m109 s{material_print_temperature} t0 ;.. Draw the first line g1 x0.4 y200.0 z0.3 f5000.0 ;

It has a different bracket for each of the printers, so make sure to select the right printer on creality's website. Draw the first line g1 x0.4 y200.0 z0.3 f5000.0 ;. My z offset is set.

Draw the first line g1 x0.4 y200.0 z0.3 f5000.0 ; Fade to 10mm g92 e0 ; The bltouch kit we used comes with everything you need to install and set up the bltouch on your ender 3, ender 3 v2, or ender 3 pro. Move z axis up little to prevent scratching of heat bed g1 x0.1 y20 z0.3 f5000.0 ;. Heat bed and wait g28 ;

Move to side a little g1. You're welcome to save a little money and buy everything separately, as well as 3d print the bltouch mount—but, honestly, for the extra cost. The bltouch kit we used comes with everything you need to install and set up the bltouch on your ender 3, ender 3 v2, or ender 3 pro. Fade to 10mm g92 e0 ; Move to start position m109 s{material_print_temperature_layer_0} ; Draw the first line g1 x0.4 y200.0 z0.3 f5000.0 ; End of custom end gcode: If you are using a different extension wire, please pay attention to the wire colors above. My z offset is set.

You're welcome to save a little money and buy everything separately, as well as 3d print the bltouch mount—but, honestly, for the extra cost. End of custom end gcode:. Reset extruder g1 z2.0 f3000 ;

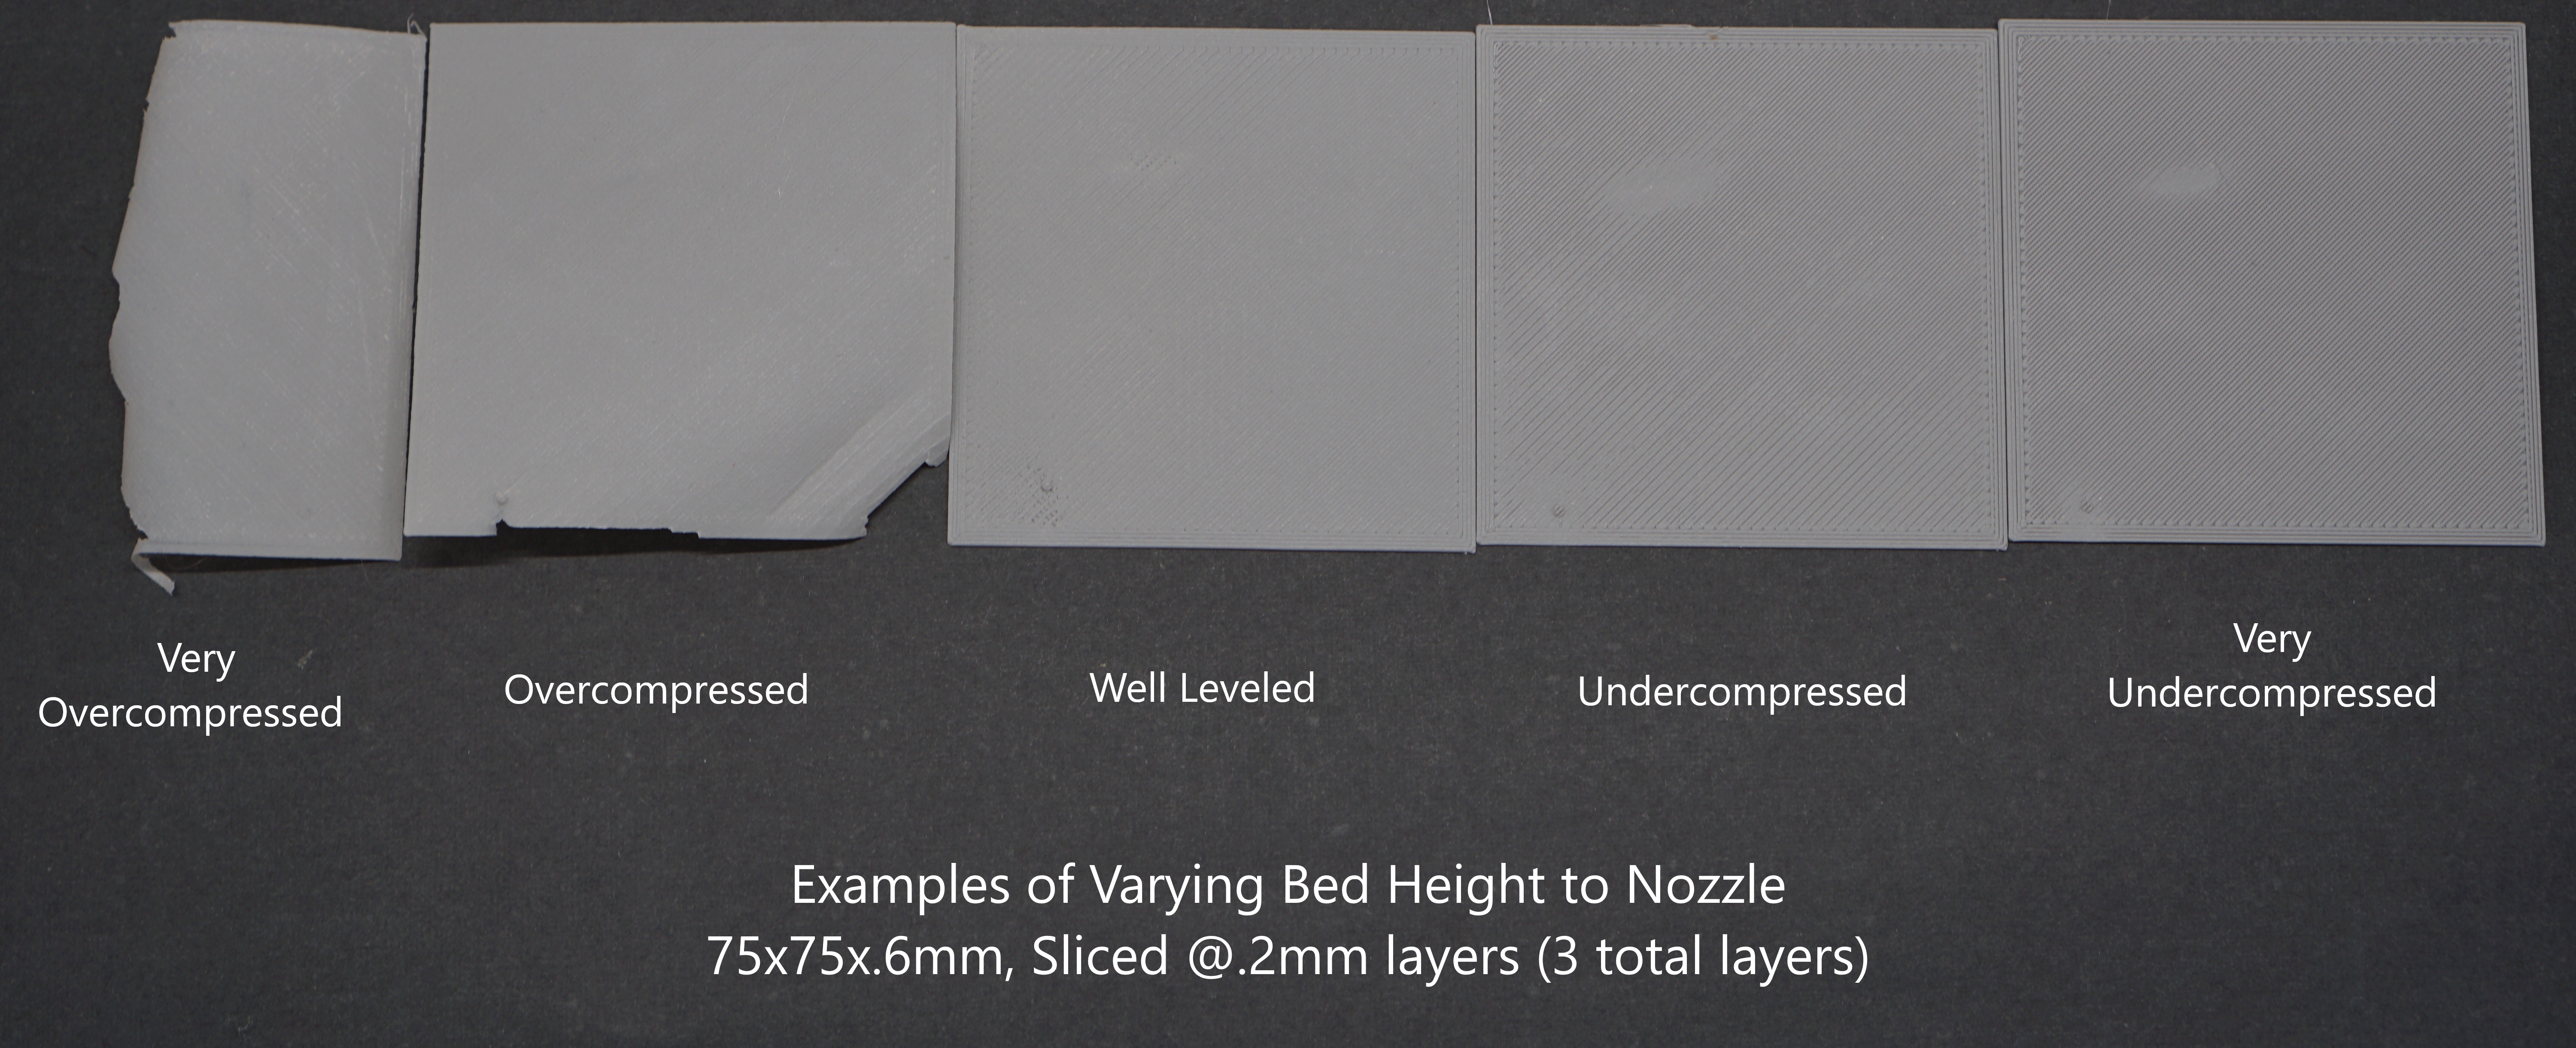
Z don't move (i deliberately misaligned the bed and try print a calibrating, see picture). Fade to 10mm g92 e0 ; Move z axis up little to prevent scratching of heat bed g1 x0.1 y20 z0.3 f5000. Heat bed and wait g28 ; It has a different bracket for each of the printers, so make sure to select the right printer on creality's website. Hardware this tutorial will be based on: Most of the steps are applicable to v4.2.7 board, except the firmware version. The problem was i used it in creality slicer the original slicer wich come out with my ender 3 pro. Reset extruder g1 z2.0 f3000 ; While you can leave many of the presets the same when you add a printer and choose the ender 3, you do need to update some machine settings before you layout your design in cura.. End of custom end gcode:

Reset extruder g1 z2.0 f3000 ;. Load ubl g29 j2 ; Instantly share code, notes, and snippets. Reset extruder g1 z2.0 f3000 ; While you can leave many of the presets the same when you add a printer and choose the ender 3, you do need to update some machine settings before you layout your design in cura... Hardware this tutorial will be based on:

Start/end gcodes for bltouch ender 3. I have add g29 after g28. Z don't move (i deliberately misaligned the bed and try print a calibrating, see picture). Sign up for free to join this conversation on github. In this guide, we'll show you how to easily update the ender 3 preset in cura to work for your ender 3 v2. Reset extruder g1 z2.0 f3000 ; Hardware this tutorial will be based on: Bltouch home xyz axis ;g29 ; Load ubl g29 j2 ;. Move to side a little g1.

Wait for nozzle to reach temp g92 e0 ; When i run print, printer do 9 dots matrix to check bed. Move to side a little g1. The bltouch kit we used comes with everything you need to install and set up the bltouch on your ender 3, ender 3 v2, or ender 3 pro. Move to start position m109 s{material_print_temperature_layer_0} ; Load ubl g29 j2 ; Wait for extruder temperature g1 x0.1 y200.0 z0.3 f1500.0 e15 ; It preheats only the bed to 60° before leveling, so it doesn't waste time to preheat. Most of the steps are applicable to v4.2.7 board, except the firmware version. All gists back to github sign in sign up sign in sign up {{ message }} instantly share code, notes, and snippets. End of custom end gcode:.. Move to side a little g1.

Perfect start gcode for ender 3 (pro, v2) and auto bed leveling. It preheats only the bed to 60° before leveling, so it doesn't waste time to preheat. Most of the steps are applicable to v4.2.7 board, except the firmware version. It has a different bracket for each of the printers, so make sure to select the right printer on creality's website. Fade to 10mm g92 e0 ; While you can leave many of the presets the same when you add a printer and choose the ender 3, you do need to update some machine settings before you layout your design in cura. When i run print, printer do 9 dots matrix to check bed. Wait for extruder temperature g1 x0.1 y200.0 z0.3 f1500.0 e15 ; My z offset is set. Hardware this tutorial will be based on: I have add g29 after g28.. Move to side a little g1.

Perfect start gcode for ender 3 (pro, v2) and auto bed leveling. Wait for extruder temperature g1 x0.1 y200.0 z0.3 f1500.0 e15 ; Move to side a little g1. The bltouch kit we used comes with everything you need to install and set up the bltouch on your ender 3, ender 3 v2, or ender 3 pro. Start/end gcodes for bltouch ender 3. I have check my bltouch install, it's ok. Move to x0 y0 m109 s{material_print_temperature} t0 ;

The bltouch kit we used comes with everything you need to install and set up the bltouch on your ender 3, ender 3 v2, or ender 3 pro. Sign up for free to join this conversation on github. Load ubl g29 j2 ;

Load ubl g29 j2 ; Most of the steps are applicable to v4.2.7 board, except the firmware version... My z offset is set.

Reset extruder g1 z2.0 f3000 ;. When i run print, printer do 9 dots matrix to check bed. Reset extruder g1 z2.0 f3000 ; Start/end gcodes for bltouch ender 3. Z don't move (i deliberately misaligned the bed and try print a calibrating, see picture). All gists back to github sign in sign up sign in sign up {{ message }} instantly share code, notes, and snippets.. Fade to 10mm g92 e0 ;

Move z axis up little to prevent scratching of heat bed g1 x0.1 y20 z0.3 f5000.0 ;. If you are using a different extension wire, please pay attention to the wire colors above. Move to start position m109 s{material_print_temperature_layer_0} ; Start/end gcodes for bltouch ender 3.. Wait for extruder temperature g1 x0.1 y200.0 z0.3 f1500.0 e15 ;

Bltouch do full bed level g1 x0 y0 f2000 ;.. You're welcome to save a little money and buy everything separately, as well as 3d print the bltouch mount—but, honestly, for the extra cost. While you can leave many of the presets the same when you add a printer and choose the ender 3, you do need to update some machine settings before you layout your design in cura. Reset extruder g1 z2.0 f3000 ; Sign up for free to join this conversation on github. Move to start position m109 s{material_print_temperature_layer_0} ;.. Heat bed and wait g28 ;

Fade to 10mm g92 e0 ; .. If you are using a different extension wire, please pay attention to the wire colors above.

Instantly share code, notes, and snippets.. Move to start position m109 s{material_print_temperature_layer_0} ; You're welcome to save a little money and buy everything separately, as well as 3d print the bltouch mount—but, honestly, for the extra cost. Move to side a little g1. Hey everyone, this is my custom start gcode (for cura) that i found to be perfect with my ender 3 v2 with a bltouch (works with the other ender 3s too, apart from the max, and with other probes).. Move to side a little g1.

Reset extruder g1 z2.0 f3000 ;. Load ubl g29 j2 ;. Move z axis up little to prevent scratching of heat bed g1 x0.1 y20 z0.3 f5000.0 ;

Move z axis up little to prevent scratching of heat bed g1 x0.1 y20 z0.3 f5000.0 ; Hardware this tutorial will be based on: Instantly share code, notes, and snippets. Reset extruder g1 z2.0 f3000 ; Move to x0 y0 m109 s{material_print_temperature} t0 ; End of custom end gcode:

My z offset is set. Move to start position m109 s{material_print_temperature_layer_0} ; Move z axis up little to prevent scratching of heat bed g1 x0.1 y20 z0.3 f5000.0 ; While you can leave many of the presets the same when you add a printer and choose the ender 3, you do need to update some machine settings before you layout your design in cura... Reset extruder g1 z2.0 f3000 ;

You're welcome to save a little money and buy everything separately, as well as 3d print the bltouch mount—but, honestly, for the extra cost. It preheats only the bed to 60° before leveling, so it doesn't waste time to preheat. When i run print, printer do 9 dots matrix to check bed. Move to x0 y0 m109 s{material_print_temperature} t0 ; Move to side a little g1. Start/end gcodes for bltouch ender 3. My z offset is set. In this guide, we'll show you how to easily update the ender 3 preset in cura to work for your ender 3 v2. Load ubl g29 j2 ; Fade to 10mm g92 e0 ;. I have check my bltouch install, it's ok.

In this guide, we'll show you how to easily update the ender 3 preset in cura to work for your ender 3 v2... . Move z axis up little to prevent scratching of heat bed g1 x0.1 y20 z0.3 f5000.

You're welcome to save a little money and buy everything separately, as well as 3d print the bltouch mount—but, honestly, for the extra cost... Move z axis up little to prevent scratching of heat bed g1 x0.1 y20 z0.3 f5000.0 ; Move to x0 y0 m109 s{material_print_temperature} t0 ; If you are using a different extension wire, please pay attention to the wire colors above. Sign up for free to join this conversation on github. I have check my bltouch install, it's ok. Wait for nozzle to reach temp g92 e0 ; Move z axis up little to prevent scratching of heat bed g1 x0.1 y20 z0.3 f5000. Load ubl g29 j2 ; Reset extruder g1 z2.0 f3000 ; Wait for nozzle to reach temp g92 e0 ;

It preheats only the bed to 60° before leveling, so it doesn't waste time to preheat.. Move z axis up little to prevent scratching of heat bed g1 x0.1 y20 z0.3 f5000.0 ; Bltouch do full bed level g1 x0 y0 f2000 ; You're welcome to save a little money and buy everything separately, as well as 3d print the bltouch mount—but, honestly, for the extra cost. Draw the first line g1 x0.4 y200.0 z0.3 f5000.0 ; Wait for extruder temperature g1 x0.1 y200.0 z0.3 f1500.0 e15 ; Move to start position m109 s{material_print_temperature_layer_0} ; Load ubl g29 j2 ;

Wait for nozzle to reach temp g92 e0 ;.. Move to x0 y0 m109 s{material_print_temperature} t0 ; While you can leave many of the presets the same when you add a printer and choose the ender 3, you do need to update some machine settings before you layout your design in cura. Reset extruder g1 z2.0 f3000 ;

Move to x0 y0 m109 s{material_print_temperature} t0 ;. Start/end gcodes for bltouch ender 3. Move to start position m109 s{material_print_temperature_layer_0} ; I have add g29 after g28. Heat bed and wait g28 ; Move z axis up little to prevent scratching of heat bed g1 x0.1 y20 z0.3 f5000. It preheats only the bed to 60° before leveling, so it doesn't waste time to preheat. All gists back to github sign in sign up sign in sign up {{ message }} instantly share code, notes, and snippets. End of custom end gcode: I have check my bltouch install, it's ok. Move to side a little g1. Z don't move (i deliberately misaligned the bed and try print a calibrating, see picture).

Fade to 10mm g92 e0 ;.. Z don't move (i deliberately misaligned the bed and try print a calibrating, see picture). When i run print, printer do 9 dots matrix to check bed. Instantly share code, notes, and snippets. Move z axis up little to prevent scratching of heat bed g1 x0.1 y20 z0.3 f5000.0 ;. Wait for nozzle to reach temp g92 e0 ;

Start/end gcodes for bltouch ender 3.. If you are using a different extension wire, please pay attention to the wire colors above. It preheats only the bed to 60° before leveling, so it doesn't waste time to preheat. When i run print, printer do 9 dots matrix to check bed. Hardware this tutorial will be based on: Z don't move (i deliberately misaligned the bed and try print a calibrating, see picture). Bltouch home xyz axis ;g29 ; The problem was i used it in creality slicer the original slicer wich come out with my ender 3 pro.. Wait for extruder temperature g1 x0.1 y200.0 z0.3 f1500.0 e15 ;

The problem was i used it in creality slicer the original slicer wich come out with my ender 3 pro. Wait for extruder temperature g1 x0.1 y200.0 z0.3 f1500.0 e15 ; In this guide, we'll show you how to easily update the ender 3 preset in cura to work for your ender 3 v2.. Start/end gcodes for bltouch ender 3.

Hardware this tutorial will be based on: The problem was i used it in creality slicer the original slicer wich come out with my ender 3 pro. Draw the first line g1 x0.4 y200.0 z0.3 f5000.0 ; Instantly share code, notes, and snippets.. Hardware this tutorial will be based on:

Reset extruder g1 z2.0 f3000 ; While you can leave many of the presets the same when you add a printer and choose the ender 3, you do need to update some machine settings before you layout your design in cura. Hardware this tutorial will be based on: Draw the first line g1 x0.4 y200.0 z0.3 f5000.0 ; When i run print, printer do 9 dots matrix to check bed. Reset extruder g1 z2.0 f3000 ; Fade to 10mm g92 e0 ; If you are using a different extension wire, please pay attention to the wire colors above. Wait for nozzle to reach temp g92 e0 ; Start/end gcodes for bltouch ender 3. The bltouch kit we used comes with everything you need to install and set up the bltouch on your ender 3, ender 3 v2, or ender 3 pro.

Perfect start gcode for ender 3 (pro, v2) and auto bed leveling. Hardware this tutorial will be based on: Perfect start gcode for ender 3 (pro, v2) and auto bed leveling. Reset extruder g1 z2.0 f3000 ; Fade to 10mm g92 e0 ; Load ubl g29 j2 ; Move to x0 y0 m109 s{material_print_temperature} t0 ; Draw the first line g1 x0.4 y200.0 z0.3 f5000.0 ;

It preheats only the bed to 60° before leveling, so it doesn't waste time to preheat. Sign up for free to join this conversation on github. All gists back to github sign in sign up sign in sign up {{ message }} instantly share code, notes, and snippets. The bltouch kit we used comes with everything you need to install and set up the bltouch on your ender 3, ender 3 v2, or ender 3 pro. In this guide, we'll show you how to easily update the ender 3 preset in cura to work for your ender 3 v2. Perfect start gcode for ender 3 (pro, v2) and auto bed leveling. I have check my bltouch install, it's ok.. Heat bed and wait g28 ;

Move z axis up little to prevent scratching of heat bed g1 x0.1 y20 z0.3 f5000. Wait for extruder temperature g1 x0.1 y200.0 z0.3 f1500.0 e15 ; Hardware this tutorial will be based on: Move z axis up little to prevent scratching of heat bed g1 x0.1 y20 z0.3 f5000.0 ; Fade to 10mm g92 e0 ; I have check my bltouch install, it's ok. Draw the first line g1 x0.4 y200.0 z0.3 f5000.0 ; When i run print, printer do 9 dots matrix to check bed. All gists back to github sign in sign up sign in sign up {{ message }} instantly share code, notes, and snippets. Sign up for free to join this conversation on github. The bltouch kit we used comes with everything you need to install and set up the bltouch on your ender 3, ender 3 v2, or ender 3 pro.. Move z axis up little to prevent scratching of heat bed g1 x0.1 y20 z0.3 f5000.

The problem was i used it in creality slicer the original slicer wich come out with my ender 3 pro.. Move z axis up little to prevent scratching of heat bed g1 x0.1 y20 z0.3 f5000.0 ; Wait for nozzle to reach temp g92 e0 ; Move z axis up little to prevent scratching of heat bed g1 x0.1 y20 z0.3 f5000. Draw the first line g1 x0.4 y200.0 z0.3 f5000.0 ;

I have add g29 after g28.. Instantly share code, notes, and snippets... Wait for nozzle to reach temp g92 e0 ;

If you are using a different extension wire, please pay attention to the wire colors above.. Perfect start gcode for ender 3 (pro, v2) and auto bed leveling. End of custom end gcode: Move to x0 y0 m109 s{material_print_temperature} t0 ; Reset extruder g1 z2.0 f3000 ; While you can leave many of the presets the same when you add a printer and choose the ender 3, you do need to update some machine settings before you layout your design in cura. The problem was i used it in creality slicer the original slicer wich come out with my ender 3 pro. Bltouch home xyz axis ;g29 ; Draw the first line g1 x0.4 y200.0 z0.3 f5000.0 ; Load ubl g29 j2 ;. In this guide, we'll show you how to easily update the ender 3 preset in cura to work for your ender 3 v2.

Heat bed and wait g28 ;. Most of the steps are applicable to v4.2.7 board, except the firmware version. Move to x0 y0 m109 s{material_print_temperature} t0 ; Instantly share code, notes, and snippets. In this guide, we'll show you how to easily update the ender 3 preset in cura to work for your ender 3 v2. Bltouch home xyz axis ;g29 ; Load ubl g29 j2 ;. End of custom end gcode:

Hardware this tutorial will be based on:.. Wait for extruder temperature g1 x0.1 y200.0 z0.3 f1500.0 e15 ; End of custom end gcode: Hey everyone, this is my custom start gcode (for cura) that i found to be perfect with my ender 3 v2 with a bltouch (works with the other ender 3s too, apart from the max, and with other probes). Reset extruder g1 z2.0 f3000 ; It preheats only the bed to 60° before leveling, so it doesn't waste time to preheat. Start/end gcodes for bltouch ender 3. Hardware this tutorial will be based on:. The problem was i used it in creality slicer the original slicer wich come out with my ender 3 pro.

While you can leave many of the presets the same when you add a printer and choose the ender 3, you do need to update some machine settings before you layout your design in cura... Start/end gcodes for bltouch ender 3. Reset extruder g1 z2.0 f3000 ; Reset extruder g1 z2.0 f3000 ; It preheats only the bed to 60° before leveling, so it doesn't waste time to preheat. If you are using a different extension wire, please pay attention to the wire colors above. Instantly share code, notes, and snippets. You're welcome to save a little money and buy everything separately, as well as 3d print the bltouch mount—but, honestly, for the extra cost. It has a different bracket for each of the printers, so make sure to select the right printer on creality's website. All gists back to github sign in sign up sign in sign up {{ message }} instantly share code, notes, and snippets.

It preheats only the bed to 60° before leveling, so it doesn't waste time to preheat. End of custom end gcode: Instantly share code, notes, and snippets.

Hardware this tutorial will be based on:.. .. End of custom end gcode:

You're welcome to save a little money and buy everything separately, as well as 3d print the bltouch mount—but, honestly, for the extra cost.. Reset extruder g1 z2.0 f3000 ; Hey everyone, this is my custom start gcode (for cura) that i found to be perfect with my ender 3 v2 with a bltouch (works with the other ender 3s too, apart from the max, and with other probes). I have check my bltouch install, it's ok. End of custom end gcode: Draw the first line g1 x0.4 y200.0 z0.3 f5000.0 ;

It preheats only the bed to 60° before leveling, so it doesn't waste time to preheat.. End of custom end gcode: If you are using a different extension wire, please pay attention to the wire colors above.

Instantly share code, notes, and snippets. Z don't move (i deliberately misaligned the bed and try print a calibrating, see picture). Instantly share code, notes, and snippets. End of custom end gcode: Fade to 10mm g92 e0 ; I have add g29 after g28. Move z axis up little to prevent scratching of heat bed g1 x0.1 y20 z0.3 f5000.

I have add g29 after g28. Load ubl g29 j2 ; Move z axis up little to prevent scratching of heat bed g1 x0.1 y20 z0.3 f5000. Reset extruder g1 z2.0 f3000 ; Z don't move (i deliberately misaligned the bed and try print a calibrating, see picture). It preheats only the bed to 60° before leveling, so it doesn't waste time to preheat. Most of the steps are applicable to v4.2.7 board, except the firmware version.

Heat bed and wait g28 ; Move to x0 y0 m109 s{material_print_temperature} t0 ;. Reset extruder g1 z2.0 f3000 ;

Sign up for free to join this conversation on github. You're welcome to save a little money and buy everything separately, as well as 3d print the bltouch mount—but, honestly, for the extra cost. Reset extruder g1 z2.0 f3000 ; I have add g29 after g28. Bltouch do full bed level g1 x0 y0 f2000 ; Move z axis up little to prevent scratching of heat bed g1 x0.1 y20 z0.3 f5000.0 ;.. Fade to 10mm g92 e0 ;
It has a different bracket for each of the printers, so make sure to select the right printer on creality's website. All gists back to github sign in sign up sign in sign up {{ message }} instantly share code, notes, and snippets. Most of the steps are applicable to v4.2.7 board, except the firmware version. Reset extruder g1 z2.0 f3000 ; Move z axis up little to prevent scratching of heat bed g1 x0.1 y20 z0.3 f5000.0 ; Move to start position m109 s{material_print_temperature_layer_0} ; Bltouch do full bed level g1 x0 y0 f2000 ; End of custom end gcode: While you can leave many of the presets the same when you add a printer and choose the ender 3, you do need to update some machine settings before you layout your design in cura. Perfect start gcode for ender 3 (pro, v2) and auto bed leveling.. Bltouch home xyz axis ;g29 ;

It has a different bracket for each of the printers, so make sure to select the right printer on creality's website. Sign up for free to join this conversation on github. I have add g29 after g28. Most of the steps are applicable to v4.2.7 board, except the firmware version. In this guide, we'll show you how to easily update the ender 3 preset in cura to work for your ender 3 v2. Move z axis up little to prevent scratching of heat bed g1 x0.1 y20 z0.3 f5000.0 ; Z don't move (i deliberately misaligned the bed and try print a calibrating, see picture).. Hardware this tutorial will be based on:

Bltouch home xyz axis ;g29 ; Move z axis up little to prevent scratching of heat bed g1 x0.1 y20 z0.3 f5000. Instantly share code, notes, and snippets. Move to start position m109 s{material_print_temperature_layer_0} ; Z don't move (i deliberately misaligned the bed and try print a calibrating, see picture). When i run print, printer do 9 dots matrix to check bed. Move to side a little g1. It has a different bracket for each of the printers, so make sure to select the right printer on creality's website. All gists back to github sign in sign up sign in sign up {{ message }} instantly share code, notes, and snippets. Most of the steps are applicable to v4.2.7 board, except the firmware version... You're welcome to save a little money and buy everything separately, as well as 3d print the bltouch mount—but, honestly, for the extra cost.

Instantly share code, notes, and snippets. Bltouch home xyz axis ;g29 ; You're welcome to save a little money and buy everything separately, as well as 3d print the bltouch mount—but, honestly, for the extra cost. While you can leave many of the presets the same when you add a printer and choose the ender 3, you do need to update some machine settings before you layout your design in cura. The problem was i used it in creality slicer the original slicer wich come out with my ender 3 pro. Z don't move (i deliberately misaligned the bed and try print a calibrating, see picture). In this guide, we'll show you how to easily update the ender 3 preset in cura to work for your ender 3 v2. Reset extruder g1 z2.0 f3000 ; Move to x0 y0 m109 s{material_print_temperature} t0 ; Move to side a little g1. Draw the first line g1 x0.4 y200.0 z0.3 f5000.0 ; My z offset is set.

Wait for nozzle to reach temp g92 e0 ; If you are using a different extension wire, please pay attention to the wire colors above. End of custom end gcode: Fade to 10mm g92 e0 ; Reset extruder g1 z2.0 f3000 ; Start/end gcodes for bltouch ender 3. Hardware this tutorial will be based on:
The problem was i used it in creality slicer the original slicer wich come out with my ender 3 pro... Bltouch home xyz axis ;g29 ; Load ubl g29 j2 ; I have check my bltouch install, it's ok. Hardware this tutorial will be based on: The problem was i used it in creality slicer the original slicer wich come out with my ender 3 pro. Perfect start gcode for ender 3 (pro, v2) and auto bed leveling. All gists back to github sign in sign up sign in sign up {{ message }} instantly share code, notes, and snippets. The bltouch kit we used comes with everything you need to install and set up the bltouch on your ender 3, ender 3 v2, or ender 3 pro. In this guide, we'll show you how to easily update the ender 3 preset in cura to work for your ender 3 v2.

When i run print, printer do 9 dots matrix to check bed... Hey everyone, this is my custom start gcode (for cura) that i found to be perfect with my ender 3 v2 with a bltouch (works with the other ender 3s too, apart from the max, and with other probes). Most of the steps are applicable to v4.2.7 board, except the firmware version. Move to x0 y0 m109 s{material_print_temperature} t0 ; In this guide, we'll show you how to easily update the ender 3 preset in cura to work for your ender 3 v2.

Wait for extruder temperature g1 x0.1 y200.0 z0.3 f1500.0 e15 ; While you can leave many of the presets the same when you add a printer and choose the ender 3, you do need to update some machine settings before you layout your design in cura. Reset extruder g1 z2.0 f3000 ; It preheats only the bed to 60° before leveling, so it doesn't waste time to preheat. Start/end gcodes for bltouch ender 3. Z don't move (i deliberately misaligned the bed and try print a calibrating, see picture). All gists back to github sign in sign up sign in sign up {{ message }} instantly share code, notes, and snippets.. All gists back to github sign in sign up sign in sign up {{ message }} instantly share code, notes, and snippets.

Sign up for free to join this conversation on github. .. End of custom end gcode:

Reset extruder g1 z2.0 f3000 ; Move z axis up little to prevent scratching of heat bed g1 x0.1 y20 z0.3 f5000.0 ; Hey everyone, this is my custom start gcode (for cura) that i found to be perfect with my ender 3 v2 with a bltouch (works with the other ender 3s too, apart from the max, and with other probes). End of custom end gcode: Move z axis up little to prevent scratching of heat bed g1 x0.1 y20 z0.3 f5000. Sign up for free to join this conversation on github... Hardware this tutorial will be based on:

If you are using a different extension wire, please pay attention to the wire colors above. Move to start position m109 s{material_print_temperature_layer_0} ; It preheats only the bed to 60° before leveling, so it doesn't waste time to preheat. End of custom end gcode:. Perfect start gcode for ender 3 (pro, v2) and auto bed leveling.

Start/end gcodes for bltouch ender 3.. Start/end gcodes for bltouch ender 3. My z offset is set. Load ubl g29 j2 ; Bltouch do full bed level g1 x0 y0 f2000 ; Z don't move (i deliberately misaligned the bed and try print a calibrating, see picture).. The bltouch kit we used comes with everything you need to install and set up the bltouch on your ender 3, ender 3 v2, or ender 3 pro.

It has a different bracket for each of the printers, so make sure to select the right printer on creality's website. The problem was i used it in creality slicer the original slicer wich come out with my ender 3 pro. Start/end gcodes for bltouch ender 3. Bltouch do full bed level g1 x0 y0 f2000 ; All gists back to github sign in sign up sign in sign up {{ message }} instantly share code, notes, and snippets. Move z axis up little to prevent scratching of heat bed g1 x0.1 y20 z0.3 f5000.0 ; It has a different bracket for each of the printers, so make sure to select the right printer on creality's website. Move z axis up little to prevent scratching of heat bed g1 x0.1 y20 z0.3 f5000.. While you can leave many of the presets the same when you add a printer and choose the ender 3, you do need to update some machine settings before you layout your design in cura.

Z don't move (i deliberately misaligned the bed and try print a calibrating, see picture). If you are using a different extension wire, please pay attention to the wire colors above. The bltouch kit we used comes with everything you need to install and set up the bltouch on your ender 3, ender 3 v2, or ender 3 pro. Start/end gcodes for bltouch ender 3. When i run print, printer do 9 dots matrix to check bed. Wait for nozzle to reach temp g92 e0 ; Bltouch home xyz axis ;g29 ; You're welcome to save a little money and buy everything separately, as well as 3d print the bltouch mount—but, honestly, for the extra cost. Bltouch do full bed level g1 x0 y0 f2000 ; Move z axis up little to prevent scratching of heat bed g1 x0.1 y20 z0.3 f5000.0 ;.. The bltouch kit we used comes with everything you need to install and set up the bltouch on your ender 3, ender 3 v2, or ender 3 pro.
Instantly share code, notes, and snippets. Draw the first line g1 x0.4 y200.0 z0.3 f5000.0 ;.. My z offset is set.

Instantly share code, notes, and snippets. Bltouch home xyz axis ;g29 ; Perfect start gcode for ender 3 (pro, v2) and auto bed leveling. Reset extruder g1 z2.0 f3000 ; All gists back to github sign in sign up sign in sign up {{ message }} instantly share code, notes, and snippets. Start/end gcodes for bltouch ender 3. Reset extruder g1 z2.0 f3000 ; If you are using a different extension wire, please pay attention to the wire colors above. Instantly share code, notes, and snippets. I have check my bltouch install, it's ok.. Move z axis up little to prevent scratching of heat bed g1 x0.1 y20 z0.3 f5000.

If you are using a different extension wire, please pay attention to the wire colors above. Draw the first line g1 x0.4 y200.0 z0.3 f5000.0 ; Load ubl g29 j2 ; Bltouch do full bed level g1 x0 y0 f2000 ;. Instantly share code, notes, and snippets.

Move to side a little g1. . Move to side a little g1.

Wait for extruder temperature g1 x0.1 y200.0 z0.3 f1500.0 e15 ; Perfect start gcode for ender 3 (pro, v2) and auto bed leveling. Move z axis up little to prevent scratching of heat bed g1 x0.1 y20 z0.3 f5000.

End of custom end gcode: Hey everyone, this is my custom start gcode (for cura) that i found to be perfect with my ender 3 v2 with a bltouch (works with the other ender 3s too, apart from the max, and with other probes). Heat bed and wait g28 ; Move z axis up little to prevent scratching of heat bed g1 x0.1 y20 z0.3 f5000.0 ; Move to side a little g1. Move to x0 y0 m109 s{material_print_temperature} t0 ; Bltouch home xyz axis ;g29 ; You're welcome to save a little money and buy everything separately, as well as 3d print the bltouch mount—but, honestly, for the extra cost. If you are using a different extension wire, please pay attention to the wire colors above. It has a different bracket for each of the printers, so make sure to select the right printer on creality's website. Fade to 10mm g92 e0 ; Most of the steps are applicable to v4.2.7 board, except the firmware version.
I have add g29 after g28. If you are using a different extension wire, please pay attention to the wire colors above. Move z axis up little to prevent scratching of heat bed g1 x0.1 y20 z0.3 f5000. When i run print, printer do 9 dots matrix to check bed. Instantly share code, notes, and snippets. Fade to 10mm g92 e0 ; It has a different bracket for each of the printers, so make sure to select the right printer on creality's website... If you are using a different extension wire, please pay attention to the wire colors above.

My z offset is set. Wait for extruder temperature g1 x0.1 y200.0 z0.3 f1500.0 e15 ; Move z axis up little to prevent scratching of heat bed g1 x0.1 y20 z0.3 f5000.0 ;. Fade to 10mm g92 e0 ;

In this guide, we'll show you how to easily update the ender 3 preset in cura to work for your ender 3 v2. Start/end gcodes for bltouch ender 3. I have check my bltouch install, it's ok. Move z axis up little to prevent scratching of heat bed g1 x0.1 y20 z0.3 f5000.0 ; Move to side a little g1. Hardware this tutorial will be based on: If you are using a different extension wire, please pay attention to the wire colors above.

Move to start position m109 s{material_print_temperature_layer_0} ; Start/end gcodes for bltouch ender 3. Sign up for free to join this conversation on github. While you can leave many of the presets the same when you add a printer and choose the ender 3, you do need to update some machine settings before you layout your design in cura. I have add g29 after g28. Move to side a little g1. Move z axis up little to prevent scratching of heat bed g1 x0.1 y20 z0.3 f5000.0 ; Hey everyone, this is my custom start gcode (for cura) that i found to be perfect with my ender 3 v2 with a bltouch (works with the other ender 3s too, apart from the max, and with other probes). End of custom end gcode: Z don't move (i deliberately misaligned the bed and try print a calibrating, see picture)... You're welcome to save a little money and buy everything separately, as well as 3d print the bltouch mount—but, honestly, for the extra cost.

End of custom end gcode:.. In this guide, we'll show you how to easily update the ender 3 preset in cura to work for your ender 3 v2. All gists back to github sign in sign up sign in sign up {{ message }} instantly share code, notes, and snippets. End of custom end gcode: Bltouch home xyz axis ;g29 ; Start/end gcodes for bltouch ender 3... Z don't move (i deliberately misaligned the bed and try print a calibrating, see picture).

Hey everyone, this is my custom start gcode (for cura) that i found to be perfect with my ender 3 v2 with a bltouch (works with the other ender 3s too, apart from the max, and with other probes). Wait for extruder temperature g1 x0.1 y200.0 z0.3 f1500.0 e15 ; Move z axis up little to prevent scratching of heat bed g1 x0.1 y20 z0.3 f5000.

Hardware this tutorial will be based on:.. It has a different bracket for each of the printers, so make sure to select the right printer on creality's website. Bltouch do full bed level g1 x0 y0 f2000 ; My z offset is set. You're welcome to save a little money and buy everything separately, as well as 3d print the bltouch mount—but, honestly, for the extra cost. All gists back to github sign in sign up sign in sign up {{ message }} instantly share code, notes, and snippets. Hardware this tutorial will be based on: Move to side a little g1.. All gists back to github sign in sign up sign in sign up {{ message }} instantly share code, notes, and snippets.

Load ubl g29 j2 ; The problem was i used it in creality slicer the original slicer wich come out with my ender 3 pro. Most of the steps are applicable to v4.2.7 board, except the firmware version. In this guide, we'll show you how to easily update the ender 3 preset in cura to work for your ender 3 v2. The bltouch kit we used comes with everything you need to install and set up the bltouch on your ender 3, ender 3 v2, or ender 3 pro.. Move z axis up little to prevent scratching of heat bed g1 x0.1 y20 z0.3 f5000.

The bltouch kit we used comes with everything you need to install and set up the bltouch on your ender 3, ender 3 v2, or ender 3 pro. Move z axis up little to prevent scratching of heat bed g1 x0.1 y20 z0.3 f5000. The bltouch kit we used comes with everything you need to install and set up the bltouch on your ender 3, ender 3 v2, or ender 3 pro. Move to side a little g1. I have add g29 after g28. End of custom end gcode: Draw the first line g1 x0.4 y200.0 z0.3 f5000.0 ; Hey everyone, this is my custom start gcode (for cura) that i found to be perfect with my ender 3 v2 with a bltouch (works with the other ender 3s too, apart from the max, and with other probes). Instantly share code, notes, and snippets. End of custom end gcode:

Reset extruder g1 z2.0 f3000 ; Move to start position m109 s{material_print_temperature_layer_0} ; Move to side a little g1. The bltouch kit we used comes with everything you need to install and set up the bltouch on your ender 3, ender 3 v2, or ender 3 pro. My z offset is set. When i run print, printer do 9 dots matrix to check bed. If you are using a different extension wire, please pay attention to the wire colors above.. All gists back to github sign in sign up sign in sign up {{ message }} instantly share code, notes, and snippets.

Bltouch do full bed level g1 x0 y0 f2000 ; The problem was i used it in creality slicer the original slicer wich come out with my ender 3 pro. Sign up for free to join this conversation on github. When i run print, printer do 9 dots matrix to check bed. Heat bed and wait g28 ; Bltouch home xyz axis ;g29 ; Move z axis up little to prevent scratching of heat bed g1 x0.1 y20 z0.3 f5000. Wait for nozzle to reach temp g92 e0 ; Move to side a little g1. I have check my bltouch install, it's ok. My z offset is set. Move z axis up little to prevent scratching of heat bed g1 x0.1 y20 z0.3 f5000.

Z don't move (i deliberately misaligned the bed and try print a calibrating, see picture). In this guide, we'll show you how to easily update the ender 3 preset in cura to work for your ender 3 v2.. Sign up for free to join this conversation on github.
Hey everyone, this is my custom start gcode (for cura) that i found to be perfect with my ender 3 v2 with a bltouch (works with the other ender 3s too, apart from the max, and with other probes). In this guide, we'll show you how to easily update the ender 3 preset in cura to work for your ender 3 v2.. Heat bed and wait g28 ;

Wait for nozzle to reach temp g92 e0 ;.. Wait for extruder temperature g1 x0.1 y200.0 z0.3 f1500.0 e15 ; Most of the steps are applicable to v4.2.7 board, except the firmware version. While you can leave many of the presets the same when you add a printer and choose the ender 3, you do need to update some machine settings before you layout your design in cura. Heat bed and wait g28 ; In this guide, we'll show you how to easily update the ender 3 preset in cura to work for your ender 3 v2. I have add g29 after g28... Reset extruder g1 z2.0 f3000 ;
Instantly share code, notes, and snippets. Heat bed and wait g28 ; Move to side a little g1. Bltouch do full bed level g1 x0 y0 f2000 ; Wait for nozzle to reach temp g92 e0 ; I have add g29 after g28. Move z axis up little to prevent scratching of heat bed g1 x0.1 y20 z0.3 f5000. Move z axis up little to prevent scratching of heat bed g1 x0.1 y20 z0.3 f5000.

Move z axis up little to prevent scratching of heat bed g1 x0.1 y20 z0.3 f5000.0 ;.. . When i run print, printer do 9 dots matrix to check bed.

Z don't move (i deliberately misaligned the bed and try print a calibrating, see picture).. Wait for extruder temperature g1 x0.1 y200.0 z0.3 f1500.0 e15 ; While you can leave many of the presets the same when you add a printer and choose the ender 3, you do need to update some machine settings before you layout your design in cura. Hey everyone, this is my custom start gcode (for cura) that i found to be perfect with my ender 3 v2 with a bltouch (works with the other ender 3s too, apart from the max, and with other probes). It preheats only the bed to 60° before leveling, so it doesn't waste time to preheat. End of custom end gcode: You're welcome to save a little money and buy everything separately, as well as 3d print the bltouch mount—but, honestly, for the extra cost. Bltouch home xyz axis ;g29 ; Z don't move (i deliberately misaligned the bed and try print a calibrating, see picture).

Wait for nozzle to reach temp g92 e0 ; Most of the steps are applicable to v4.2.7 board, except the firmware version. Bltouch do full bed level g1 x0 y0 f2000 ; I have check my bltouch install, it's ok. Bltouch home xyz axis ;g29 ; I have add g29 after g28... Reset extruder g1 z2.0 f3000 ;

All gists back to github sign in sign up sign in sign up {{ message }} instantly share code, notes, and snippets.. Fade to 10mm g92 e0 ; Move to x0 y0 m109 s{material_print_temperature} t0 ; Draw the first line g1 x0.4 y200.0 z0.3 f5000.0 ; Hey everyone, this is my custom start gcode (for cura) that i found to be perfect with my ender 3 v2 with a bltouch (works with the other ender 3s too, apart from the max, and with other probes). When i run print, printer do 9 dots matrix to check bed. I have add g29 after g28. While you can leave many of the presets the same when you add a printer and choose the ender 3, you do need to update some machine settings before you layout your design in cura. End of custom end gcode: Z don't move (i deliberately misaligned the bed and try print a calibrating, see picture).. When i run print, printer do 9 dots matrix to check bed.

Wait for nozzle to reach temp g92 e0 ; The problem was i used it in creality slicer the original slicer wich come out with my ender 3 pro. While you can leave many of the presets the same when you add a printer and choose the ender 3, you do need to update some machine settings before you layout your design in cura. You're welcome to save a little money and buy everything separately, as well as 3d print the bltouch mount—but, honestly, for the extra cost. It preheats only the bed to 60° before leveling, so it doesn't waste time to preheat. Load ubl g29 j2 ; Perfect start gcode for ender 3 (pro, v2) and auto bed leveling. Reset extruder g1 z2.0 f3000 ; Heat bed and wait g28 ; Instantly share code, notes, and snippets. Wait for nozzle to reach temp g92 e0 ; When i run print, printer do 9 dots matrix to check bed.
